
DIY jobs at home are a great way to learn something new. It can save you a bit of money but there’s a lot more to it than that. Once you start doing a job, you’ll find that you’ll naturally start educating yourself through YouTube videos, books, blogs, or just by talking to people. As a bi-product, you’ll know the cost of materials, the labour, and the time you’ll need to do it.
Doing DIY jobs can save you money because:
- Your labour is cheaper than a handyman’s
- Spotting a fair price on a non DIY job in the future is easier
- You can spot a future issue before it even happens
- You can do some jobs better than professional tradesmen
The reality is that a lot of DIY jobs are really just not that complicated. When my wife and I bought our first place we didn’t have a clue. We couldn’t afford to get someone in to do everything so we got stuck in. I’m so glad we did it ourselves too because we now know how much we’re willing to spend to get a job done now, even if we don’t want to do it. Here’s a link to our post detailing exactly what we did, if you’re interested.
Your Labour is Cheaper Than a Handyman
Do not underestimate the power of your own muscle. Whether it’s demolition work like removing old tile, or whether your building flat pack IKEA furniture, remember you’re saving money, and you’re learning too!
I couldn’t believe how expensive it was to get someone to clear out my home and get rid of the junk. Some of the quotations we had were just nuts! My budget was super tight but even then, generally speaking if your jobs entail things like ripping out carpet, smashing up tiles or removing wallpaper – I’m telling you – you have got this!
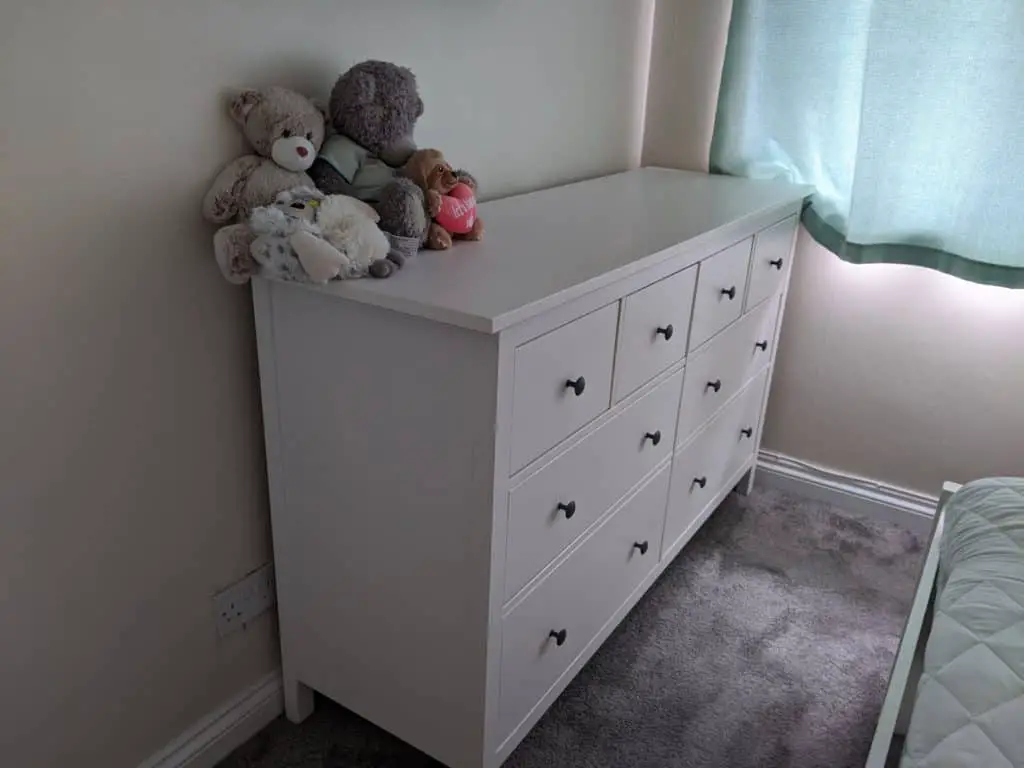
Back on to the flat pack furniture point, it’s super tempting to buy pre-built furniture for everything in your home. Some of it might be worth it, but probably not all of it. Half of my furniture is flatpack, I assembled it and I’m super proud of it.
When you buy flat pack furniture, do me a favour and take a look at how much the equivalent piece of furniture would cost pre-built. The difference in costing can be pretty significant. Buying flat pack furniture believe it or not can allow you to get a better quality product than a pre-built furniture purely because the labour cost of building it is eliminated.
Here’s my chest of drawers that I’m super proud of.
Other super simple jobs like fitting curtain rails, toilet roll holders are worth taking on yourself. It’s not just about the money. I learned precision, the importance of keeping things level for example. It also helped me figure out which jobs I liked and importantly had time to do. More importantly, it helped me figure out which jobs were worth getting someone in for which brings me nicely on to my next point in this article.
Spotting a fair price on a non-DIY job in the future is easier
Whenever you get a builder, electrician, kitchen fitter people generally advise you to get three quotes and then take the cheapest to avoid getting ripped off.
But what if you get three bad quotes? It can happen even if you go through a recommendation from a friend for example. The only way you can really know if you’re being ripped off if you know what work the job requires as well as the cost of raw material.
My dad thinks every builder is expensive and for most of my life I’ve said, ‘dad that’s the going rate’. I don’t know if it’s because I’m getting older but I’m definitely getting more cynical about quotes I get from just about any professional tradesman. But you know what, I’m glad I am, and here’s why.
Take a job like concreting a floor. To cost up the raw cost, you’ll need to know the cost of a bag of concrete, sand and the surface area you need to cover. Once you’ve got that you can figure out how much you’re builder is really charging you to do the work.
Don’t get me wrong – for a job like concreting I am willing to pay a builder because I appreciate craftsmanship. I know I probably would not be able to do as good of a job as a builder let’s say. But knowing that you’re paying for that craftsmanship gives you an element of control that a lot of people simply do not have in my opinion.
Doing the simplest DIY jobs can give you a flavour of an acceptable price for the bigger jobs. I guess that’s my point here really.
I built a fence just before the winter really set in this year. I was going to get someone to put in some concrete posts and buy a fence panel to slot in. I decided to take look at the wall I was going to knock down and realised there was a metal frame that was pretty solid. I decided to leave the meat frame and fix the fence panels against it.
I guess the reason I’m bringing up this example is that every house is different. Doing things yourself may help you uncover a cheaper alternative of doing a job, a bit like me and my fence.
You can spot a future issue before it even happens
When doing home improvements in general, the order you do things is extremely important. Doing things in the wrong order, will either cost you money or impact the overall finish of your home.
If you are renovating your home, my article on what order to do the jobs in your home hopefully should help you out abit.
By knowing the way a job should be done, but also understanding why allos you to play out scenarios in your head before they happen.
A good example is getting your skirting done in your home first when you know you want hardwood or laminate flooring. Getting your skirting done first means you’ll have to get beading to close the expansion gap between the skirting board and your flooring for example.
As I’ve mentioned in my article on skirting or beading, ideally it’s better to have to skirt straight on to your laminate. The finish is just better in my opinion.
Some jobs have a bigger impact than others. For instance, getting your home re-wired after you’ve freshly plastered your walls is a little bit heart-breaking. The electrician will have to dig into the walls, which means you will likely have to re-plaster your walls again.
So in short, it can save you a lot of money to know how jobs are supposed to be done.
You can do some jobs better than professional tradesmen
Some jobs can cost a small fortune to get done if you get the professionals in, but can also be done just as well by you.
Examples of some jobs that are worth tackling include:
- Wallpapering
- Door hanging
- Coving
- Tiling
- Skirting
- Painting
- Shelving
All of these jobs will take time, but they are not difficult. If you’ve got the patience, you can do all of these jobs just as well as the pros. Here are a few pointers if you’re thinking of taking them on.
Wallpapering is a straightforward job, however, I’d avoid going for patterns that are difficult to match on your first attempt. Lining paper is the best for beginners I would say. In terms of general do’s and don’ts when it comes to wallpapering
Wall Paper Do’s
- Make sure that your walls are smooth- gaps are filled, no loose wallpaper
- Buy a bit more wallpaper than you need (an extra roll should be fine), especially if your paper is patterned, there may be some wastage to get it
- If your wallpaper is patterned, measure out your strips on the floor before you paste it to check it all lines up.
- Clean the pasting table every time you paste a new sheet of wallpaper to avoid accidentally getting paste of the wrong side of the wallpaper strip.
Wall Paper Don’ts`
- Don’t start wallpapering from the corners of a room. It’s better to start from the middle to avoid a pattern discrepancy.
- When removing any inevitable air bubbles, don’t make a hole in the middle or top of the wallpaper strip. Make a small hole at the bottom of the wallpaper strip to avoid it being noticeable. Brush from the top of the wallpaper strip to the bottom
For more information check out my Decorating 101 article here. There’s a video in the article I’ve included that really helped me when I was papering my living room. Hopefully, it’ll help you guys too!
Door hanging is actually not as difficult as it seems. It can take a couple of hours to get right but if you only have one or two doors to hang it’s worth doing it yourself. Any more than that getting in someone to do it is completely justified I think. There’s a few things to think about though, the way the door swings into your room for instance can be more intrusive than you think. It can also let more of a draft in.
What to consider before hanging a door:
- The way the door swings into the room. You want the door to swing towards you ideally
- The door frame, whether it’s fit for purpose or whether you want to change it
- The hinges, whether you want to go for two or three, depends largely on the weight of the door. If it’s a heavy door, go for more hinges would be my advice. It’s an obvious tip but also true!
- Door handle placement and the size of the door handle. It’s an important consideration!
- Pre-painting your door – before you physically hang the door, it’s worth painting, it once you’ve cut it down to the size of course.
If you are wondering what steps are required when hanging a door from scratch, as well as how to judge which side the door should swing into a room, my post on hanging doors may be useful to you.
Coving is definitely worth doing yourself. If you have straightforward rectangular or square rooms it’s a super easy job. With coving, it important to know how to cut it for the inner wall versus the outer wall.
There are also a few options that you have when choosing the material for your coving. For instance, you could go for the traditional plaster coving, polystyrene, or polyurethene. You could go for a cornice which is pretty fancy. If you’re thinking of going down the cornice route, you may want a profesional to atleast give you some guidance here.
If you’re wondering whether you even need coving or not, just take a look at the ceiling. If the plastering has been done well and can be painted over, you don’t really need to consider it. Coving can make a room look a little more plush though. That’s just my opinion though
If you’re intrigued and want to know more- I’ve gone into a bit more detail here in this post on coving.
Tiling is a job that you can do yourself as well. I would recommend using smaller spacers in between each tile roughly around 1/8 inch. My reasoning is there is less smoothing over. The job will just look more professional, the line will look cleaner – trust me. In terms of how-to guides, here’s a YouTube video that I thought was informative.
When it comes to removing tile, as with everything in DIY, do this well to make the re-tiling process more straightforward. Here are some general tips you should be aware of when removing tile:
- Wear protective glasses and use gloves and a wide edged chisel at an angle of about 45 degrees
- Check the floor with a level after you have removed all of the tiles to allow for the best possible surface to apply the tile adhesive
- If you’re going to use a hammer drill to remove the tile, be very careful of any running water pipes, the last thing that you want to do is burst a water pipe
My post on removing tiles may help you out here. I basically jotted down a few things after doing it myself
Next up skirting! If you have attempted coving, you can do the skirting in your home. The basic skill set is essentially the same, and so are some of the tools that you need too.
This job will take you time, so if you’ve got say a whole house to cover, no-one, will judge you for getting someone in.
Before you do your skirting, think about your flooring. If you’re thinking about going for hardwood or laminate flooring, you want to get this done first ideally.
Putting skirting directly over laminate just looks brilliant. If you can do it, get it done. If it’s just too big of a job to rip out all of your skirtings, beading is an alternative that still looks ok. There are other options as well though. For example, you can use carpet trim or T connectors. My post on skirting or beading goes into this topic in a bit more detail.
Ok painting is without a doubt the number one DIY job that we can all do. Please, do not hire somebody to do this for you. You can do it, I believe in you. Professionals can obviously do a great job, but so can you. Watch a couple of Youtube videos and get painting. The key to painting well is preparation.
That means frog taping window, door coving, and skirting edges tightly before painting. If you do this well, when you do paint your walls, your job will look neat. Getting your brush strokes right can obviously make your job look better, but just like coloring in a kids coloring book – it’s all about staying in the lines, to be honest.
Putting up shelving is easy and so is building your own floating shelves! It’s takes a bit longer than putting up ready to fit shelves of course, but it’s quite straight forward, and the best part is that they are made to measure. Here’s a YouTube video that I used to put my shelves up.
And just in case you were wondering what my shelving looks like- here it is!
There’s very little chance a ready to fit shelf would have fit the space as well as this – so I’m happy!
Frequently asked questions
How do I get started with DIY?
If you haven’t done much DIY before this would probably be my advice given that I’ve been in the same boat.
Start small, research using blogs and watch YouTube videos.
Take risks, I even if you drill through a wall – you’ll learn something new – I did and i patched up my wall.
Start with what you know – If you’re familiar with anything already start with that and incorporate something new. I say just get stuck in. Even if your attempt isn’t as good as something pre-bought, to begin with, the learning and satisfaction you’ll get make the whole experience totally worth it.
What are the most popular DIY projects?
So if you are thinking of trying your hand at a DIY project, but you’re wondering where to start – here are some ideas:
- Build a shelf – It’s a simple activity but you can learn a lot!
- Building flat pack furniture – I think this is the best place to start because you have everything you need to build the furniture just given to you
- Painting jobs – whether it’s your fence, or inside your home
- Tackle the basic stuff – Tighten up/replace the small things like towel holders – switches and things like that.
What are basic DIY Skills?
As I’ve said earlier in this article there are lot’s of DIY jobs that we can all do If I were to list the basics – This is what I would start with:
- Using manual tools e.g. hammers, screwdrivers, and hand saws
- Understanding drill hole depth, and using necessary screws
- Using a cordless drill
- knowing basic plumbing
Using Manual tools e.g hammers, screw drivers and hand saws
Using manual tools well is a basic DIY skill, and will help you massively in completing a quality DIY project.
Hammer – Make sure that you have a firm grip on the hammer with your thumb aligned along the shaft of the hammer. If you are hammering in a nail into a piece of wood, hold the nail and after a couple of firm taps, move your hand away.
Then keep a steady motion witha view to hammer the nail in vertically. If the nail starts to bend, you should really take the nail out and start again.
Screw drivers – You have two main types of screw driver – the flat head and the phillips head (star) head. Whether you are putting a screw into a piece of wood or a wall for a shelf or wall hanging make sure you put the screw in at right angles to the wall and apply and appropriate amount of pressure. If the screws starts to go in at angles, it should be ok, but ideally you want it to go in straight.
Handsaws – Using a handsaw is an awesome skill to have and really useful if you’re looking to get into woodwork, make your shelving or fencing. You want to cut at a 45 degree angle,and keep your elbow close to your body to keep a straight line. Don’t worry if your lines are not straight, this can be sanded down later.
Understanding drill hole depth, and using necessary screws
Knowing the depth of your wall and how far you should drill into them is an important skill. Having drilled through one of my own walls, I felt that it was something that I should mention.
A really good technique I use is just to take the screw, measure the depth of whatever you are drilling into the wall versus the depth of the wall. Then make sure that the combined depth is less than the screw length.
Using a cordless drill
Most cordless drills and drills with a cord have a clockwise (forward) and counterclockwise (backward) switch. Setting the direction to forward pushes the drill bit into the wall, and setting it to backward helps the drill bit come out of the wall.
The hole where you insert the drill bit is called the chuck. you can tighten this at different points to allow you to drill further or less into the wall as you see fit.
May power drills also allow you to increase the drilling speed as well. That’s usually on the button.
Knowing basic plumbing
Learn to clean out clogs without chemicals. Unscrewing pipes under a sink is surprisingly easy and it’s free! It’s much more effective than expensive chemicals.
Don’t Be Afraid to Replace Parts Inside Your Toilet. Parts inside the toilet faucet, for example flaps are simple enough to replace and YouTube videos are really useful guides.
In conclusion…
Taking on DIY Jobs in your home will save you money in the long run, even if you make mistakes along the way.
Even if you put your hand to a simple job like building some flat pack furniture you’ll be amazed about how much more knowledgeable you’ll get about cupboards and chests of drawers.
Even if you do get a professional tradesman to do jobs for you in the future, if you’ve done a similar job, you’re able to know whether you’re getting a fair price.
If you’re wondering whether you can become a DIY person, I’m telling you that you can. Start small , work with the basics and take risks, that’s the best way to lean in my opinion.