

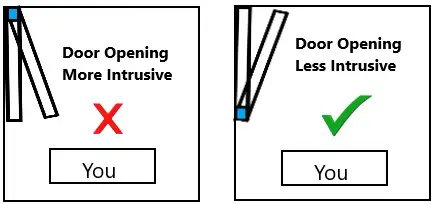
When I had to decide which way our porch door opened into our living room, my first thought was, why does it even matter? But then my architect buddy said something quite profound (well it was profound to me anyway). ” You want the door to open towards you, and not the other way around”. All jokes aside, it was true. The below diagram helps to illustrate why.
Your door should swing open inwards towards you.
It’s not that the door should swing in from the left or right-hand side necessarily. Depending on the configuration of your room, you’ll know which way is the least intrusive.
Let’s be honest, when someone enters the room, having that extra couple of seconds of privacy because the door opens the right way is always helpful. If you find that your door is stiff, or scraping the floor, putting some packing behind the hinges should help. Let’s get into that as well as hanging the thing!
Getting the Door to Swing Freely
I’ve got to admit, hanging a door for the first time was not the easiest task in the world. Some elements are a bit of an art. For instance when you’re fitting standard hinges like this (link to Amazon) to an interior door; To get the door to swing freely, you may need to add some packing for example behind the hinge plate anchored to the door frame.
To get your door to swing freely, you’ll need packing for 2 reasons:
- You’ve chiseled out too much wood out of the door frame or the door when you’re creating the notch for your hinge, so as a result the door hangs unevenly and gets stuck.
- Someone else chiseled out too much wood when creating the notch making the door hang unevenly.
As far as packing materials go, everyday cardboard will honestly do the trick. Using one or more layers of cardboard, place underneath the hinge to raise the hinge level should free the door to swing without obstruction. That being said if you do want some more hard-wearing packing, here’s an example you can buy (link to Amazon)
Once you get the right fit, screw it into place. To avoid this issue in the first place, just bear in mind how much wood you chisel out when preparing your door for hanging. Ok, on that note – let’s get into hanging a door!
How to Hang a Door in 6 Easy Steps
Step 1: Remove Existing Door. Unscrew the existing door and remove hinges if re-usable.

Step 2: Check New Door Height. Stand a new door up to the door frame and use a pencil to mark from the top where you need to trim.
Step 3: Trim the door down to the right height and width. Use a planer for wood and trim from the top of the door and take an extra 3mm from the top and bottom of the door for clearance. Then trim the width and take an extra 3mm of each side for clearance.
Step 4: Mark the position of hinges on the new door and chisel. Line up the new door to the door frame. Use a pencil to mark the position of the hinges from the old door. If your frame is new, mark a hinge line every 30 inches. The first hinge should be about 12 inches from the top.

Step 5: Chisel the notches. Use a chisel to create notches in the new door at the depth of the hinge plate. This is so it sits flush with the door. Then screw in.

Step 6: Line up the door and loosely screw in one screw in one of the holes of each hinge plate. Move-in and out to check swing. Adjust as necessary.

Cutting your Door to the Right Size
There are other things you have to think about as well.
Cutting the door to size is a trial and error job. The gap between the door and the floor is an important consideration.
You want the gap between the floor and the door to be large enough for the door to move freely and not scrape the floor underneath it. But, you also want the gap to be small enough to keep the draft away.
The standard distance between an interior door and the floor is around 1/2 inch over finished floors, but 3/4 of an inch is acceptable too.
If you are thinking of fitting your own door, here’s a quick list of things I think you’ll need (link to Amazon). I’ve mentioned some of the items included in this list further down the article too.
Things you Need to Consider when Buying your Door, Hinges and Handles
In being a helpful neighbor, it’s my duty to tell you guys what you need to think about when buying a door. I needed 7 doors for the place I was renovating so hopefully these tips I picked up are useful.
The thickness of the door
You want the door to sit flush with your door frame, and so if you buy a door that’s either too thick or thin, it’s going to look silly.
The thinnest interior door you can buy is 1 3/8 inches, and the thickest is 1 3/4 inches.
Don’t stress yourself out too much about this. You do have a degree of flexibility when it comes to making adjustments. This is because you can move the inner frame of the door a centimeter or two as you see fit.
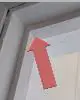
When we say inner frame we are talking about this part of your door frame.
Number of Hinges
Generally, every standard interior door should have one hinge every 30 inches, which is about right.
Use your judgment though. For instance, my porch door has 3 hinges on account of the glass in the middle of it making it heavier.
Door latches
Make sure you buy a door latch as well as a handle.
The latch is the part of the door that keeps the door closed. Door handles are sold separately a lot of the time, so make sure you remember to get one.
Tools you Need to Cut and Fit your Door
Okay, so when it comes to the tools that you need to fit a door, after doing it and also looking at what tools other people have used, I think that the following tools will make your door hanging adventure more successful:
- A work bench like this (Link to Amazon) to rest the door on – or any large table will do here as long as it’s sturdy.
- A pair of clamps to keep your door still when you are cutting it or sanding down to size. I would recommend these WorkPro clamps (Link to Amazon) The protective jaw guards protect the door from damage and they are really reasonably priced. To be fair if you buy the work bench you can probably get away with not buying this.
- A cordless drill (Link to Amazon) for holes for the hinges and to boar holes in the door for the handle and door latch.
- A chisel and mallet like this (link to Amazon) set to make the notches for your hinges.
- An electric planer (link to Amazon) is super useful to cut down your door to size. If you’re hanging multiple doors – it’s a must to get the job done quickly. A manual one will work too but it will take you longer.
- The JigTech Pro (link to Amazon)- I have not tried this but it looks too fantastic not to mention. Essentially it’s a door latch clamp that provides a guide to drill holes for your handles and latches. If you’re hanging multiple doors, this may be for you.
- A Pencil & Measuring Tape – You need these to measure and mark the door for trimming.
Mistakes I made when Hanging a Door for the First Time
When you are cutting the door to size, there’s going to be a lot of sawdust! I was cutting our porch door in our living room, rested on a couple of tables with some sheets put down, which probably made the job harder. Literally had the vacuum cleaner out every couple of minutes.
I also had my trusted spirit level to make sure I was cutting the door at the same level. Because I was cutting the door on carpet too, getting the door to stay level was annoying, to say the least. This is because carpet by its nature is springy – so don’t do that either.
I also decided to tackle the door hanging job at night time, which was also a mistake. This is mainly because I had to do everything indoors otherwise I couldn’t see anything. It also annoyed my wife…and the neighbors.
What I should have done? Well here are some of my lessons learned.
Lessons Learned from my First Experience of Door Hanging
Lesson 1: I should have started my job in the daytime and on a dry day
So starting the job at night and doing this completely indoors adds time and irritation to the whole door-hanging job.
Doing the job outside would have meant that I could have started the job on a level surface above the ground which would have made cutting the door evenly easier.
It would have also meant that keeping the bottom of the door level would have been easier to assess.
Lesson 2: Once I had cut the door to size, I should have fully painted it before fitting it.
There are lots of points to paint on a door. As well as the main sides of the doors, you also have the hinged side of the door to paint, the door handle side as well as the top and bottom of the doors.
To avoid a bad job, finish the painting before you put the door up.
Lesson 3: Make sure the light switch is next to you when you open the door
Thankfully, this dawned on me when I was fitting the doors in my home but it’s still worth mentioning.
When you open a door imagine if the light switch is on the wrong side of the door. Ideally, you want the switch to be on the wall you are next to as you enter the room.
In Summary…
So hopefully I’ve given you some information to go on in terms of steps, tools, and practices required and if you’re looking to hang your own doors or if you’re just curious about how the job is done in the first place.
I have to say after hanging a few doors myself, there is absolutely a level of skill required to get it right, but practice and you will get there. If I can do it, so can you.
When I had to decide which way our porch door opened into our living room, my first thought was, why does it even matter? But then my architect buddy said something quite profound. ” You want the door to open towards you, and not the other way around”. The below diagram helps to illustrate why.