

Properly secured floorboards are important to ensure a solid foundation for your home. I’m talking about a squeak free, stable floor that can stand on its own right as the main flooring in a room or one that supports the flooring that you plan to put on top. But should you glue, screw or nail in the floorboards to get those floorboards to sit tight?
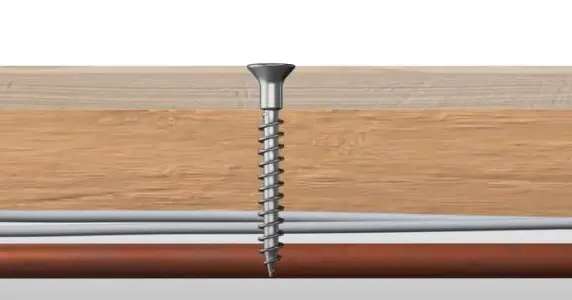
Screwing in floorboards is preferable to gluing or nailing them in. Temperature fluctuations over time cause wood to expand and contract constantly which can loosen nails, allowing floorboards to move and squeak. Gluing in floorboards can create access issues to pipework and wiring underneath. Screws on the other hand have a tighter grip because of the thread creating a longer and higher quality hold.
Before you rush out to buy your pack of screws, there’s some useful checks to carry out before you start as well as some tips to get your floor just right. Don’t screw it up, here’s the 6 things I think you should brief yourself on. I’m going to cover screwing, replacing, repairing, protecting, levelling your floorboards as well as fitting flooring on top!…Right let’s get into it.
1. Screwing in your floorboards – Check the current state first
Take a walk over your floorboards. Any rotten floorboards will need to be replaced – mark them up with some chalk, pen or pencil. If there any loose or squeaky boards – mark these too as you’ll need to screw these in too.
Before you start screwing in the boards, run a piping or cable detector like this one (link to amazon) over the board to make sure you don’t accidently sever a cable or burst a pipe. Scan either side of the joist to get an accurate reading but also to see which direction the wires and pipes are running.
Alternatively, you can obviously lift up the boards to check for cables or pipe but if you have a lot of ground to cover then it’s worth getting it. Once you’ve done that mark where you need to put the screws in.
For the loose boards that just need to be held in place, it’s best to replace the nails or existing screws in my opinion. I would recommend replacing the existing nails or screws with a high-quality screw like this (link to amazon). The durability will pay you back in the long run.
Okay – so when it comes to putting the screws in screw in vertically, into the joists and below floor level. If you need to smooth down any uneven areas use a belt sander or an orbital sander to get the job done.
If you are looking to carry out any re-wiring or plumbing – this would be a good time to do it. The order you do your DIY jobs really does save you money. So, if this is one job of many, for your wallet’s sake – plan carefully. I’ve written another post on what order to carry out your jobs here, if it’s helpful.
2. Screwing in your floorboards – Removing and replacing floorboards
Before you start lifting the old and rotten floorboards, check if any are already fixed with nails or screws. It’s best to take them out first. A claw hammer should do the job of taking the nails or screws out if the floorboards are in a bad way to be honest. If the screws are in there pretty tight, use a drill with the star head and unscrew in an anti-clockwise motion.
When lifting the floorboards, long utility bars (link to amazon) are pretty good and can save your back a lot of strain.
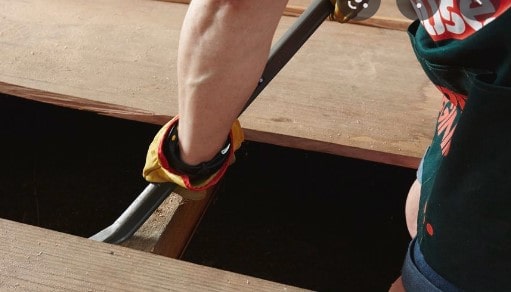
Top tip: When you’re using the utility bar, look for the shorter sections of floorboards first. They sometimes are not nailed or screwed in and can give you a head start in lifting other boards. Use a hammer to wedge in the bar, but don’t go deeper than the thickness of the board.
Use the utility bar to lever the floorboard out. Check the board for any nails or screws and take them out. It’s best to do this as you go along to avoid accidently injuring yourself.
What if there’s no short section of floorboard?
If there’s no short section of a floorboard, create one! All you have to do is cut a section along one of the boards. Use a drill to initially create a hole in the board, then use the jigsaw to cut the rest of the section out.
It goes without saying that it’s worth checking for pipes and cables before you cut and use the piping and cable detector if you have bought one. If there are pipes and cables where you are intending to cut, use a curved handsaw. Here’s an example (link to amazon) but you should be able to pick one up at your hardware store . Just make sure you stop at the joists!
If the floorboard length you are replacing is over 3 meters long, use a couple of utility bars to prize the board up, using the curved part of the bar to get under the wood. Knock the curved section of the bar under the wood using a claw hammer.
3. Screwing in your floorboards – Repairing gaps in your floorboards
Some of your floorboards may be salvageable. So, before you replace everything consider your options. There are a few options when it comes to filling in the gaps in your floorboards.
When filling gaps in your floorboards, options include filling the gaps with PVA glue and saw dust, wooden strips or simply using floor filler. Floor filler is the easiest option and can be very effective for small repairs and holes.
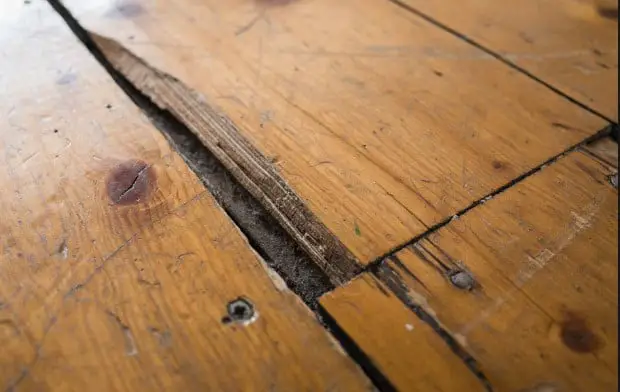
Given that we are talking about floorboards here and not expensive hardwood flooring, I would recommend using a floor filler. Here is an example of the type of floor filler (link to Amazon) you would be looking at. It’s cheap, sets quickly and it’s waterproof. This type of filler should only really be used on small repairs such as holes or cracks.
Anything larger – replace the section of floorboard would be my advice.
4. Screwing in your floorboards – Protect your floorboards
At this point you’ve done the hard work of screwing in loose floorboards, replacing the rotten boards if you have any – and the floor feels pretty solid.
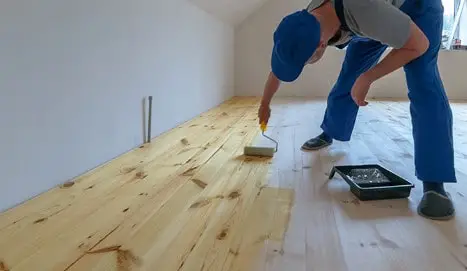
If you want to protect your flooring against wear and tear or if you intend to use the floorboards as your primary flooring you’ll need to sand it down and apply some treatment to protect against future rot and water damage. Make sure you open your windows, and wear masks and gloves before handling any of the chemicals mentioned below. They are pretty potent.
The steps you need to take to get a decent finish include.
- Clean any loose debris from the floorboards
- Wipe down with methylated spirit or cellulose thinner to clean any excess stains from the boards
- Apply stain/wood treatment with a 75mm paint brush. The treatment will be touch dry in 30 minutes – so don’t take too much time in one spot
- Sand over any uneven spots and apply a second coat.
Top tip: Avoid using white spirit on the floorboards as it tends to smear grease and other oils rather than removing them
5. Screwing in your floorboards – Use hardboard to get the floor level
At this point you may be happy with the floorboards – and if they feel strong and sturdy – that’s great – there’s no issues with getting your carpet fitted or your flooring fitted at this stage.
So, why do you need hardboard over your wooden floorboards then?
Hardboard provides an even surface over your floor which will lead to a higher quality finish once carpet or flooring is laid on to. There is also an insulation gain which will help keep your home warmer.
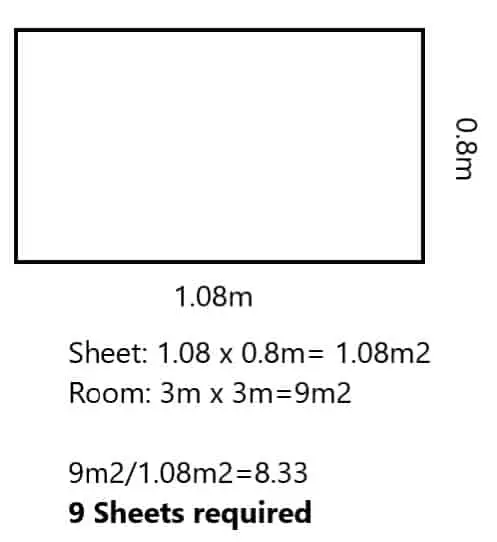
There are few sizes of hardboard that you can buy, each 3mm thick. The larger sizes have the benefit of covering a larger surface areas. They also require less joins. The larger the boards make be harder to transport, so if you’re doing the job on your own, think about what’s comfortable for you to transport and fit by yourself.
I would recommend sheets of 1.08m x 0.08m. For a typical 3m x 3m room this is how you would work out how many sheets you would need. In the example below you would need 9 sheets.
Top tip: It’s best to buy an extra sheet to allow for cutting and wastage. You’ll need to buy some 2mm x 20 mm annular ring shark nails. They’re strong and sturdy but won’t go through the existing floorboards.
Before you fit your hardboard there’s a few things you need to be aware of before you fit them.
- You need to rub in some water into the rough side of the hardboard and allow to dry for 24 hours before you fit it. This makes the hardboard expand and contract a little before fitting. The idea is that the boards will not move around once fitted.
- No room is exactly square so you should look to find the center of the room, and divide the room in quarters.
- As general rule hard board should be fitted smooth side up and should be laid 90 degrees to the floorboard.
I found this video from B&Q really useful when I was doing my floor. It covers the points mentioned with some extra detail too.
Is there a hard board that I can buy that protects against water damage?
If you are worried about water damage, you can buy WBP (Weather boiled Proof) plyboard instead of hardboard to protect against wear and tear.
6. Screwing in your floorboards – Fitting flooring over floorboards
Okay, you have repaired, replaced and screwed in your floorboards. You have even installed hardboard flooring over your flooring. It’s a great time to install laminate or hardwood flooring – it’s a great time to do it.
The most important thing to remember is that hardwood flooring and laminate flooring are prone to the same issues as your floorboards. They will expand and contract with moisture and are prone to warping. It’s really important to install them correctly, keeping an expansion gap between the flooring and the wall.
My article on beading and skirting provides more context and hopefully answer any questions you may have on the size of the expansion gap etc.
Still have questions? Here’s some common questions that come to mind when it comes to floorboards generally and my answers.
Should you fill gaps in floorboards to improve insulation?
Filling normal gaps in floorboards is not a good idea. It will get pushed out as the wood expands and contracts with moisture. For any breaks or cracks in the wood, filler is fine.
Can wooden floors be as quiet as carpet flooring?
Generally speaking, wooden floors will always be louder than carpet flooring. This is because carpet can absorb the noise of footsteps as well as the sound of televisions and speakers. It is the reason why in many households, people opt to have carpets upstairs and wooden floors downstairs.
Why do floorboards squeak more in the winter?
Generally, there is more moisture in the air in winter. Combined with extra heating used in the winter floorboards will generally expand and contract more in the winter causing them to squeak more.
How do I know if my floorboards need replacing and how often should they be replaced?
Floorboards typically last between 25-30 years from installation if properly installed. Your floorboards need replacing if you can see warping or buckling of your floorboards. Excessive squeaking or cracking may also indicate that you need to screw in or replace existing rotten floorboards.
To conclude on floorboards…
Floorboards are the foundations of your room. Screwing in your floorboards for me are the best, longest last approach to keeping your floor anchored to the ground. They are also the most flexible when it comes to accessing underneath them.
For a long-lasting hold, buy high quality screws as mentioned above, and put in the time to protect your floorboards to prevent squeaking and creaking in the long run. Remember if you are fitting wooden flooring on top, the levelling of your floor is extra important and contributes to overall finish.
I hope you found this article useful, and if you did, please visit again!