

Removing old tiles, especially stubborn floor tiles & wall tiles is a physically draining activity, but it’s not hard. Expect noise, dust, and mess. Approach systematically & be cautious of damage to pipework and electrics.
In my current home, I removed the tiles in two bathrooms and a kitchen, and the process itself is straightforward. As long as you approach it logically, and regularly clean up, you’ll be done in no time. After you have removed your tiles, it’s also a great opportunity to correct problems with the floorboards and problems with doors that won’t close for example left by the previous owners of your property.
Removing Old Tiles Easily
The process you should follow to remove your tiles easily can be summarized in the following steps.
- Clear your room of all redundant items
- Close the door, and tape up to avoid loose tile flying into another room
- Buy heavy-duty rubble bags to fill up tiles. Don’t overfill them or the bags will split
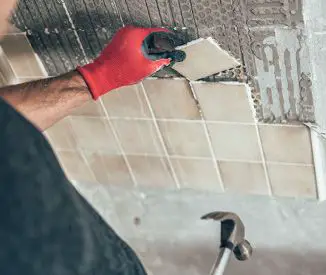
- Use a hammer drill or lump/claw hammer, pry bar, and chisel to break up tiles, tackling the wall tiles first
- Remove loose tiles using the bags and sweep up at regular intervals until all tiles are removed
- Move on to the floor tiles, and repeat the process
Buying Heavy Duty Rubble Bags (link to toolstation website) is super important here. Tiles are heavy and sharp when you start hammering and chiseling them off your wall.
The last thing you want is for the tiles to split the bag and fallout or hurt someone.
Close and tape up your door to avoid loose tiles flying everywhere and dust in the rest of your house. The last thing you want is to have to clean up the dust that’s traveled around the rest of your house after you’ve finished a job.
Do not use a sledgehammer to break up the floor tiles. You might think the heavier the hammer, the quicker you can break the old tiles up. Using a sledgehammer here can cause some serious damage to your floor joists, so stick to a claw hammer or a lump hammer to break them up.
A Hammer drill can allow you to remove your tiles quicker especially on your own. You’ll need the following type of chisel set (SDS chisel set – link to Toolstation website). The thick wider angle chisel heads are sturdy and will stay intact. You’ll only need to replace them if you lose them.
Break up an area of tile with a lump or claw hammer, then use a hammer drill to bring up the rest of the tile and subsequent tiles.
If you are removing your tiles with your partner or friend, you don’t really need a hammer drill. It’s safer and still pretty quick to remove all of the tiles with a hammer, chisel, and pry bar (for the tougher, stuck on tiles).
The prybar’s particularly good when you’re removing your floor tiles ad you can really use your own momentum to pry up the tougher tiles quickly.
Once you have removed your tiles, it’s a good time to check if your plywood is even and screwed correctly. If your tiles were previously squeaky in any way shape or form, now is the time to fix it.
Removing Old Tiles is Noisy and Messy

Give yourself at least a day to remove the tiles in a given room. It’s a noisy job as well, so don’t start too early in the day or finish too late. Your neighbors will appreciate the consideration.
To make the process of removing your old tiles as stress-free and straight forward as possible, remove as many items from your room as possible.
In my case, I was fully gutting my home, soI basically removed my kitchen cabinets and worktops, along with sinks and bathtubs in my bathrooms as well. It made the job of removing my old tiles considerably quicker
If you’re not fully replacing other items in your room, it’s probably worth covering them in plastic and taping them up tightly. The dust generated from breaking up tiles can sometimes stain and discolor plastic items as well.
Wear the right protective clothing
When you’re breaking up tiles, splinters are literally flying around everywhere. The last thing you want is a piece to get into your eye, so make sure you wear goggles.
Sturdy footwear is also advisable where your feet should be fully covered. Breaking up tiles in your flip flops for example is a bit of a no-no.
Gloves are also super important. The risk of accidentally cutting yourself is super high.
Dust masks are also advisable because of the level of debris flying around.
Can I lay my new tiles over old tiles?
Tiling over tile is perfectly acceptable and can save you the hassle of ripping out your old tiles in the first place.
There are a couple of easy things you need to do to prepare your surface before you get the tile adhesive out though.
- Rough up the surface with an electric circular sander or apply surface primer e.g. Mapei Eco grip primer (link to tool station) over the existing tile so the adhesive will stick to it.
- Apply a waterproofing membrane.g Mapei Aquadefense (link to screwfix.com) to avoid future mold and water leakage issues.
Apply one coat of the surface primer, and two coats of the waterproof membrane making sure you cover everything.
You will need to buy additional beading for the outer edges of your tiles, which will need to be cemented in.This is because you want your tiles to sit flush with the beading and because of the extra space required.
When tiling over floor tiles it’s also important to consider the impact on doors for example.
Your doors may scrape against the tiles because of the rise in floor height. For information on making this adjustment, here’s a post I wrote on hanging doors in my house that may be of some use to you.
Once you have done that, all you need to do is stick on your tile adhesive apply your tiles and grout. This approach will save you a ton of money and time if you do it yourself.
As mentioned in my post on renovating your house on a budget, the more jobs you can do yourself that don’t take too much time the better, You can honestly save yourself a fortune.
Can you paint over tiles?
You can paint over tiles, however, it’s not really advisable to paint tiles that are exposed to direct contact with water as the paint will run and fade over time. I only really have tiles in my bathroom and kitchen so this wasn’t something that I was particularly interested in.
Should you tile a bathroom floor or wall first?
It makes sense to tile your walls before you tile your floor in order to protect your floor tiles from any fallen tile adhesive, grout, and dust.
Floor adhesive and grout is more likely to fall on the floor than the wall. It’s better to give the tiled room as much time to set and harden whether you choose to use tile adhesive or mortar.
Given that you will walk on your floor tiles, you’re more likely to disturb the natural setting process if you choose to tile your floor first.
How do I calculate how many tiles I need?
Calculating how many tiles you need for a given tile could not be easier. calculate the area of each wall (the length x width) in inches. Then calculate the area of each tile (length x width) in inches.
The number of tiles you need = The area of the Wall/the area of each tile + 10% (to account for any broken tiles you may need to replace)
Tile grouting comes in large 5-10 kg bags. your tile retailer will be able to work this out for you, but the bags themselves are relatively inexpensive.
Taking the time to work out how much you need, you would need to take into account:
- Total area being tiled (in metres squared)
- Tile size (height and width in mm)
- Tile depth (thickness in mm)
- Size of spacers between your tiles (the gap between each tile in mm)
Rather than confusing yourself, I would suggest just buying the 5 kg bag and buy more in you need it. It’s usually sufficient in my experience, and because it’s cheap, if you buy extra it’s not a big deal.
Infact, if you do end up buying extra it may come in use if you need to replace an individualtile for example.
How do I know what size tile spacer to use?

Generally, the rule is to use tile spacers of 2-3 mm for ceramic tiles on the wall, and around 5 mm for floor tiles. Porcelain, granite, and marble tiles are generally installed with a 3 mm spacer.
There is no hard and fast rule. If you want the grout to be more visible, choose a larger spacer, and visa versa for a less visible spacer.
Porcelin or Ceramic Tiles – Which to use and the difference
Porcelain and ceramic tiles are both made out of the same clay, however, porcelain is heated and pressed at a higher temperature than ceramic tiles. It is the more expensive choice as it has higher durability and a less porous surface.
I’ve always seen porcelain as the ‘posh’ tile. One thing I do like about it, is that if you do happen to chip it, the same design of the top layer is visible underneath. This makes it less obvious.
Are Ceramic tiles waterproof?
Ceramic tiles are covered with a glaze to give them some waterproofing. Any chips will make them more porous to water.
What’s important is the waterproofing membrane that should be applied underneath the tile as already mentioned earlier in this post.
It’s important to remember that whilst the ceramic tile may be relatively waterproof, the grouting is not, which makes it even more important to make sure your waterproof membrane has been applied properly.
Does Sealing Grout Make a Tiled Wall Waterproof?
Sealing grout alone does not make your tiled wall waterproof. Instead the sealant prevents the grout getting moldy and getting discolored.
The waterproofing is entirely dependant on the waterproofing membrane underneath the tile.
Grout sealant ideally should be applied every 6 months in order to prevent it from being discolored.
Rather than doing this though it makes sense to buy an epoxy grout mixture with sealant that’s already mixed in. It’s slightly more expensive but it’s less maintenece in the long run.
Removing grout from a bathroom
If your tiles in your bathroom look okay, but your grouting is making your bathroom look worn and tired, try cleaning it with a grout stain remover. If this doesn’t work re-grouting is a much cheaper alternative.
You’ll have to remove your existing grouting to begin with using an angle grinder or a bespoke grout remover like this one from Screwfix.com.
once you have removed the grout, re-applying your new grouting is a relatively simple exercise.If your tiles are worn, you could apply
Is tiling expensive?
If you are tiling yourself it’s relatively inexpensive. If you are hiring a professional to carry out the tiling, the price can vary but should be no more than £40 per square meter in the UK.
If you are looking to cut some costs when employing a professional, you could ask them to tile over your existing tiles, as usually the majority of their charge is related to breaking the old tiles and preparing the area for new tiles.
If you have asked your tradesperson to fit your bathroom or kitchen you could also look to do some of the smaller jobs like fitting the sink and toilet yourself as well to save yourself some money.
Alternatives to re-tiling your bathroom
Tiling around your bathtub or shower is not the best option out there when it comes to waterproofing. Having experienced a number of different leakages from chipped tiles and porous grouting, some of the alternatives I can tell you are more effective when it comes to keeping water out.
PVC Panels- A cost-effective option currently on the market. I decided to use this option in my shower cubicle after re-tiling my shower cubicle twice. It’s a brilliant waterproof material with some surprisingly stylish options.
Acrylic Panels – If you are looking for a more expensive polished look, acrlyic panels are good option. They are re-inforced with fibre glass, and definetly have that touch of class to them.
Stainless Steel – If you’re looking for an ultra-modern material you could fit stainless steel as shower panel material. Just make sure all the seams are caulked with silicone to prevent leaking and mold growth from behind the panels
Marble – If you’re looking to spend some major bucks, marble is an alternative to porcelin and ceramic tiles. You will probably need to get a specialistto fit it.
Wooden paneling – Not the most popular or hardwearing option on the market, wooden paneling can offer a natural look to your bathroom. You’ll need to treat the wood. You’ll need to replace it more frequently, as the moisture would make the wood bend and warp.
Paint – You could remove your tiles, plaster over it, and paint it with water-resistant, steam-resistant paint. It’s definitely the cheapest option on this list
In Summary…
Removing tiles is not a difficult process. As long as you approach it logically and regularly remove the broken tiles, you can remove the tiles quickly.
Removing old tiles is a messy process. Before you decide to start removing your tiles, check if it’s even necessary to do so. If you’re grouting is looking tired and wornbut your tiles are in good shape if may be worth just re-doing your grouting.
When you do rip up your old tiles, it’s also worth checking old floorboards and plywood underneath to makesure it’s properly screwed in. If you have previoulsy noticed some squeaking in the tiles, now is the time to fix it.
When it comes to re-tiling your bathroom your options are not just limited to porcelain and ceramic tiles. You could decide to use PVC, acrylic panelling or any of the other options mentioned on this post.
If you have any other DIY jobs you are looking to do or have any other questions, why not check out some more of my content. Learn from my mistakes so you don’t have to make them in the first place.