

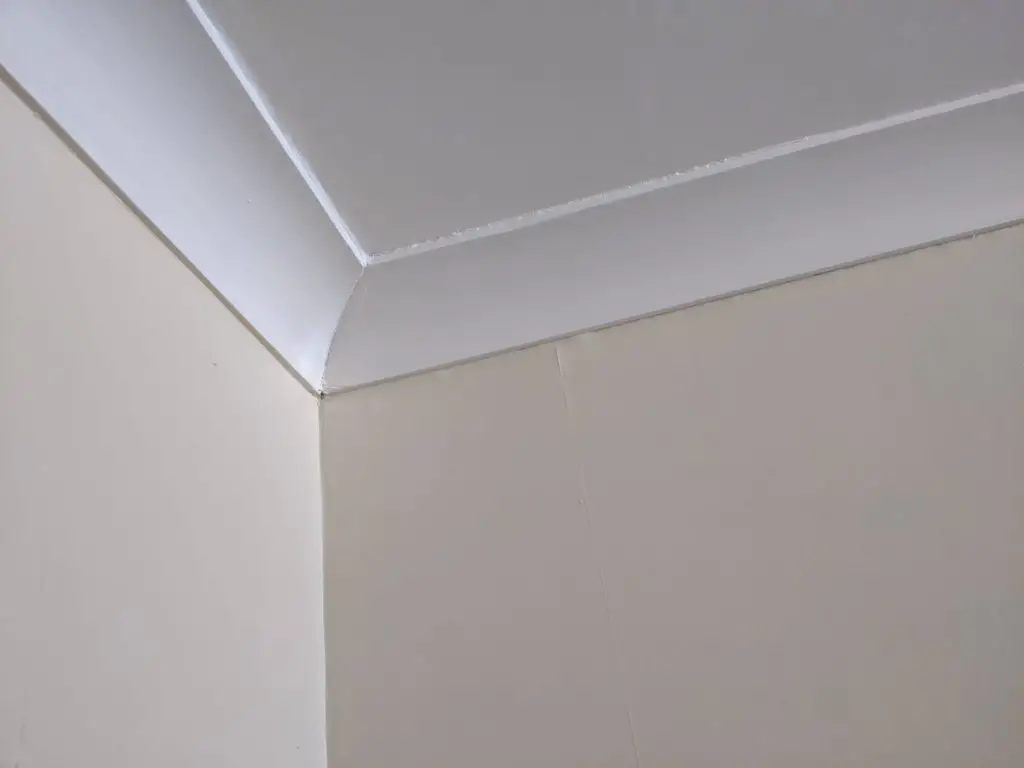
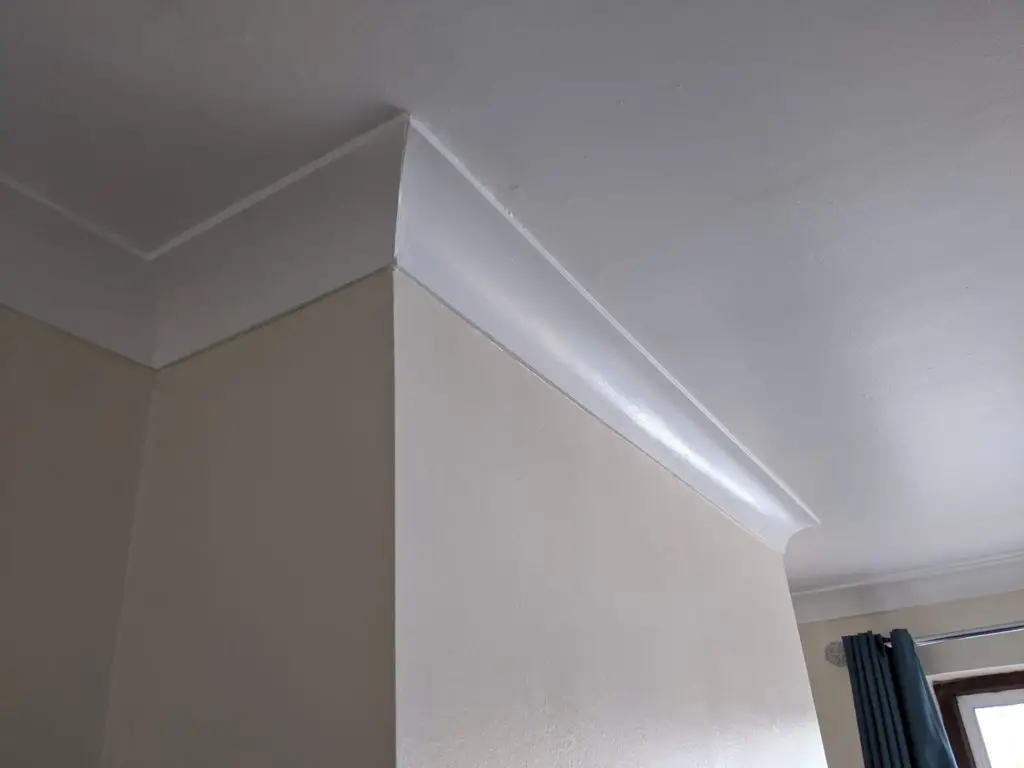
I’ve always been a fan of coving whether it’s plaster or polystyrene. Firstly, it’s great for covering cracks and bad plastering, but it’s also great in providing a decorative separation between the ceiling and the adjoining wall.
Should you go for plaster or polystyrene coving?
Polystyrene coving is cheaper than plaster coving. It’s light and airy material also makes it simple to fit. Polystyrenes absorbent nature does mean that it may need more coats of paint. Plaster coving is however regarded as having a more expensive and polished look.
Coving in general does tend to suit some rooms more than others. Bathrooms, in particular, are a bit of a no-no for me, just because I think the clean separation between tiles and the ceiling wall just tends to look better. When it comes to choosing the type coving, and putting it up there are a few things to consider before you make your choices.
What is the Best Material for Coving?
As far as coving goes, the following materials are the main ones available:
- Plaster – My preferred option – the most expensive, but has the best finish.
- Polystyrene – The most cost-effective option as mentioned, may require multiple coats of paint as it’s quite absorbent.
- Polyurethane – Hardened plastic. I’m not a fan of the finish but this is a great option for a low maintenance option. You also don’t really need to paint it.
What is the Best Adhesive for Coving?
When you are choosing an adhesive, try and get yourself a solvent-free adhesive.
Using solvent-free adhesives is preferable for a few reasons besides it being safer and odourless:
- It’s easy to work with and spread on your coving since it’s water-based.
- It’s long setting – This may seem like a bad thing but it gives you more flexibility to make sure you get your positioning just right.
- It’s easy to remove, which is useful if you need to re-decorate.
Solvents based adhesives on the other hand are fast setting, have a strong odour and are hard to remove. The choice is pretty easy, to be honest.
In case you’re wondering what the difference is between solvents and solvent-free adhesives; solvent-free is water-based and contains less than 5% of solvents, whereas the solvent-based tend to have much larger amounts.
Coving adhesive can be expensive if you pick the tubular bottles and you have a lot to do. My advice would be to buy the 5-litre+ tubs if you can to save yourself some money.
- Fe bond Blue Grit – Linked to Tool Station
- Roberts 2057 Tile Adhesive (Solvent Free) – Linked to Home Depot website
- Henry 430 Clear Pro – Linked to Home Depot website
On average once you have applied the coving with the adhesive, it will take about 24 hours to fully dry.
How do I Know what Size Coving I Need?
When it comes to choosing your coving, make sure you can apply the same sized coving consistently across your house. So before you pick a certain type of coving, just take a walk around your place and make sure there is not anything obstructing you from keeping it consistent.
When it comes to taking a measurement, people tend to underestimate the size of the coving they need.
As well as thinking of the ‘drop’ i.e how far the coving extends down the wall once fitted, the diagonal measurement across the ceiling should also be taken, just to make sure that your coving doesn’t fall short of where you expect it to.

Bear in mind that coving is most commonly seen in four sizes in terms of it’s width:
- 90mm
- 100mm
- 127mm
- 135mm
The sizes of the lengths of coving that are available in lengths from 1m to 3m. Hopefully, this can help you to decide how much coving you need.
How to Cut Coving Corners?
Lots of my friends get worried about cutting coving corners and often call in builders to do their coving because of it, but it’s not as hard as it looks.
You can either use a mitre box or a mitre triangle to do your coving. Both are good. Personally, I prefer the mitre triangle, just because I found it easy to master and quick to use.
A few things you need to remember before you start:
All wall angles should have corners at an angle of 90 degrees, although some older walls will be slightly out. Therefore in theory each side of a coving corner should be 45 degrees.
When you are coving on the inside of a wall, the wall length of the coving is longer and ceiling length is shorter.
When you are coving on the outside of the wall the ceiling length is longer and the wall length is shorter.
It’s worth marking on the coving with a pencil which side of the coving you are cutting for the ceiling, and which side you’re cutting for the wall just so you cut the right lengths.
Okay – now to actually cut the coving. It’s so simple we can cover it in 6 simple steps! For simplicity, I’m going to assume you’re right-handed. If you are left-handed, just stand on the other side of the coving.
How to cut for the coving inside of the wall:
- Measure the wall you want to fit the coving on to.
- Mark with a pencil “the wall side” of the coving as well as “the ceiling side”.
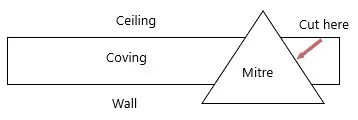
- Place the coving on a flat surface.
- Using the mitre, place it so the wider end of the mitre is on your side.
- Start cutting with a saw, following the diagonal lines.
- The length of the “wall side” to the end of the coving should be the length of the wall.
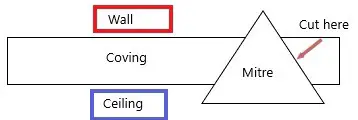
How to cut for the coving outside of the wall:
Follow the same process as above but with one important difference:
The length of the “ceiling side” to the end of the coving should be at the length of the wall.
If you are using the mitre box you can still apply the same theory here.
How to Stick Coving up?
Once you have cut all of your lengths of coving, you have the pieces of your jigsaw puzzle. You just need to put them into place:
- Generously apply your adhesive to the back of your coving strip with a scraper knife.
- Push into place between the wall and the ceiling.
- Using a hammer to knock some nails or pins just under the coving to hold it in place.
- Remove the excess adhesive spilling over the edge.
- Repeat process with each coving panel.
What is the Difference Between Cornice and Coving?
If you have not heard of a cornice before do not worry, I had no idea what it was either until I was looking to put some coving in my home.
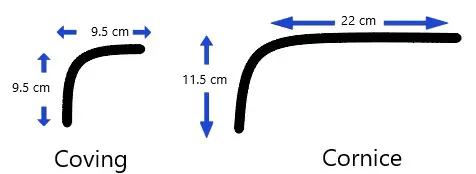
A cornice is generally known as a grander form of coving to most people. Coving is generally pretty uniform in its dimensions, e.g having the same length drop and projection (length across the ceiling). Cornice’s, on the other hand, can have a longer projection across the ceiling.
So what’s the difference between cornice and coving? Here’s a diagram to better illustrate what I’m on about.
Getting cornice coving as you can imagine is significantly more expensive than coving, just because it’s more bespoke in design.
It’s the type of design you would expect to see in a ballroom or something like that. In a normal-sized room with a ceiling height of around 2.1 m-2.4 m, I personally would not even consider getting cornice coving as it makes the room seem smaller.
In a much taller room, anything about 2.75 m, you can consider getting cornice coving.
Should you Paint Coving or Walls First?
When it comes to painting, I start with the ceiling and go down, if you know what I mean. If you are painting the ceiling and coving the same color, which is what I did, it tends to make the job easier. For ceilings, I tend to go for a white emulsion or pale soft colors generally.
How I paint my walls and coving:
- Using masking tape mask just under the lip of the coving where it meets the wall, not the ceiling as close as possible but not covering the coving.
- Use a long roller – Roll the main area of the ceiling with your emulsion paint. The first coat should be watered down (70% paint 30% water). Or you can buy primer paint.
- Use a brush to paint the edges and the first coat on the coving. Make sure you paint carefully under the lip of the coving.
- Repeat 3 times, removed the masking tape, and leave to dry.
- Apply masking tape to the lip of the coving and the lip of the skirting boards around the room.
- Using a brush paint the edges of the wall closet to the coving and skirting boards.
- Use a roller for the main areas of the wall.
- Repeat 2-3 times.
If you are painting your coving a different color to the ceiling, mark off the top and bottom lips of the coving before you paint the ceiling.
To wrap things up we hope that we covered the basics of coving as well as the types of coving available to you.
Coving can add a lot of character to your home and is relatively inexpensive, especially if you do it yourself. Now you have the know-how why don’t you give it a go?